


Free Lead Magnet Generator (+ Guide)
A lead magnet generator that turns your checklist, guide, steps, prompts or video lesson into one interactive page, with an email gate and your own email platform's signup form.
Write your lead magnet, or start from an example, pick a style, and get one page with light and dark mode, an email gate and your own email platform's signup form. It's all made in your browser.
Kind
Checkboxes readers tick, remembered in their browser, with a count at the top.
Your words
Start with # and the title, then one line under it. Each ## starts a section. - [ ] is a checkbox, - is a list item, - [Name](link) note is a resource, Tip: Warning: and Note: are boxes, > is a quote, 3 backticks and a label open a box to copy (close it with 3 backticks), and a YouTube or Vimeo link on its own line is a video.
Style
You
Gate and subscribe bar
Readers see the first sections, then the email box, with the rest blurred behind it.
Where the emails go
The gate opens on the page and nothing is sent anywhere. Good for trying it out first.
Footer
Put it live
Netlify hosts websites, with drag and drop publishing.
Log in first: a drop without an account is locked with a password, and deleted within an hour unless you claim it.
- A free Netlify account
- A folder with your page in it, named index.html
- 1Make a new folder, put your page in it, and rename the page index.html.
- 2Log in to Netlify.
- 3Open app.netlify.com/drop.
- 4Drag the folder onto the page.
- 5Your page is live at an address ending in netlify.app.
- 6To update it, drag the new folder onto the drop zone on the site's Deploys page.
Netlify's own guide: Netlify Drop quickstart
Put my lead magnet page live on Netlify. The page is the-ai-os-starter-checklist.html, in this folder.
1. Make a folder for the site, and copy the-ai-os-starter-checklist.html into it as index.html.
2. Install the Netlify command line tool if I don't have it, log me in, and deploy the folder to production.
3. Give me the live link. Open it, and check that the page loads, the light and dark switch works, and the email form shows.
4. Tell me in plain English how to add my own domain, and how to update the page later.New to Claude Code or Codex? The guide under this tool shows how to start, step by step.
Preview
The preview never sends an email anywhere. The page you download does.
Download the page for Netlify, Vercel, GitHub Pages or your own site. Copy the embed code for HighLevel, ClickFunnels, Kajabi or WordPress.
This free lead magnet generator turns your checklist, guide, steps, prompts or video lesson into one page people can use, with light and dark mode, an email gate, a subscribe bar and your own email platform's signup form.
There's no signup and nothing to install. Everything is made in your browser, and you get one HTML file, or the code to paste into your page builder.
Here's what's inside this guide:
- What a lead magnet generator is
- The 5 kinds of lead magnets, with a real example of each
- How to connect 12 email platforms step by step, from Kit and beehiiv to HighLevel and Kajabi
- How to put your lead magnet live on 12 hosts and page builders, from Netlify and Hostinger to ClickFunnels and WordPress
Every step comes with a prompt, so Claude Code or Codex can do it for you.
What is a lead magnet generator?
A lead magnet generator is a tool that turns what you know into something people give their email for. You bring the words, and it makes the rest: the page, light and dark mode, the email box, and the code that sends each signup to your email platform.
This one makes interactive pages, not a PDF people read once. Checklists remember their ticks, prompts copy with one click, and a video lesson jumps to each chapter.
What is a lead magnet?
A lead magnet is something useful you give away in exchange for an email address: a checklist, a short guide, a set of prompts or a lesson. It solves one small problem quickly, so the reader trusts you with the next one.
The best ones are quick wins. A checklist, a cheat sheet or a template can be made in hours and read in minutes, which is why they work for most creators.
How to make a lead magnet
The 5 kinds of lead magnets, with an example of each
Every example below was made with this tool, from the examples it starts with.
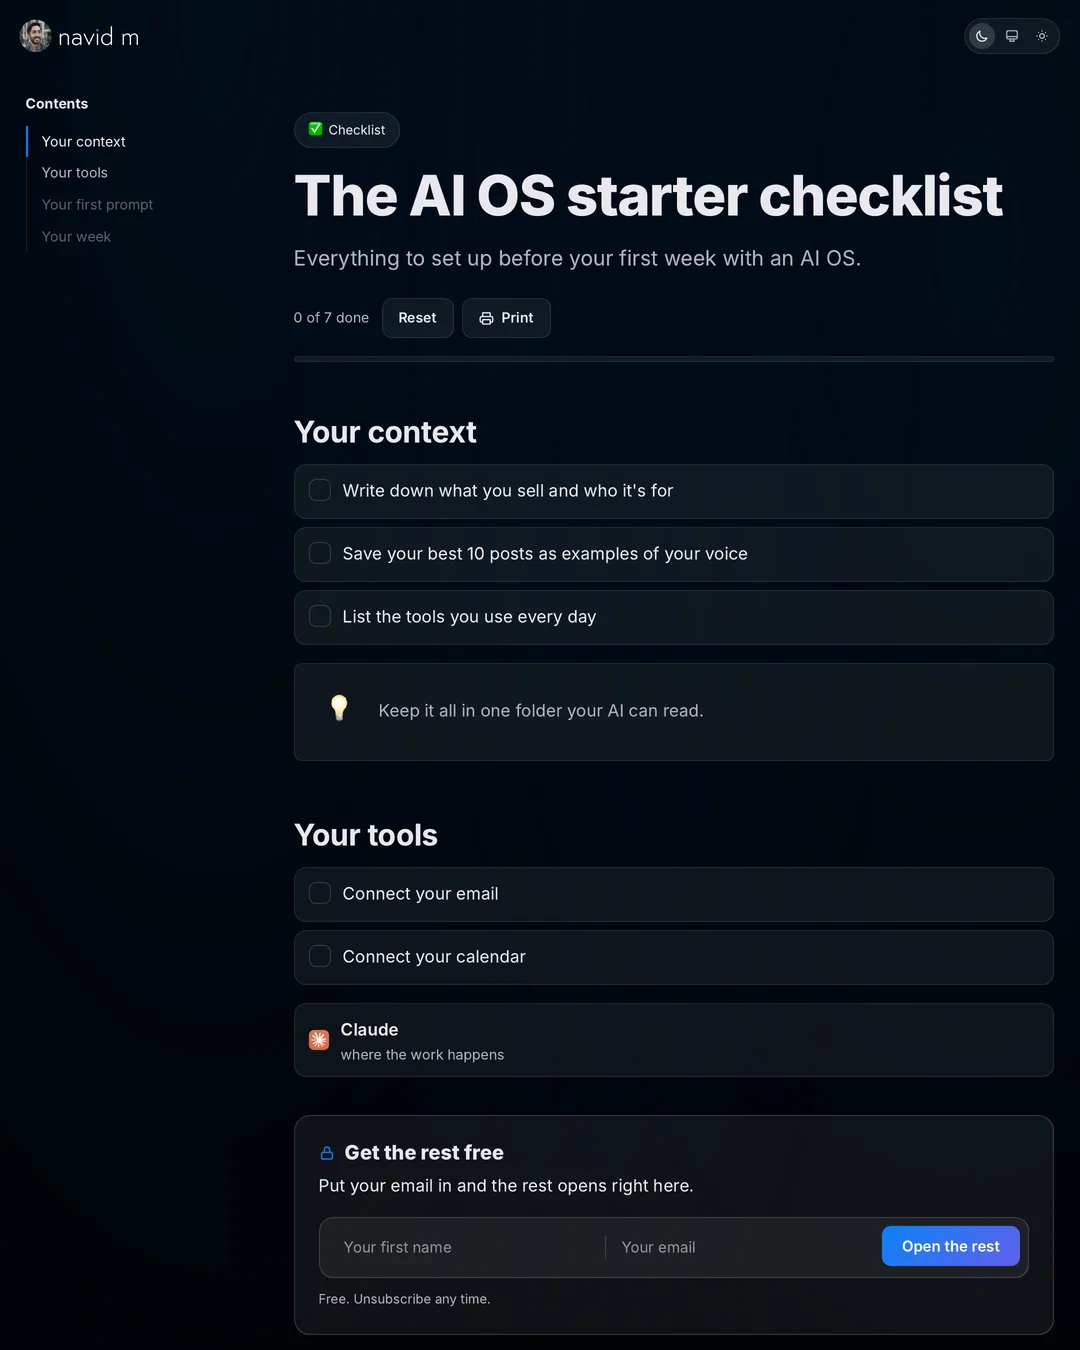
Checklist
Checkboxes readers tick, remembered in their browser, with a count and a progress bar at the top. Good for a process, a launch or a setup.

Guide
Sections with a contents list at the side and a reading bar at the top. Good for teaching one thing well.

Step by step
Numbered steps, each with its boxes to copy. Good for setting something up.

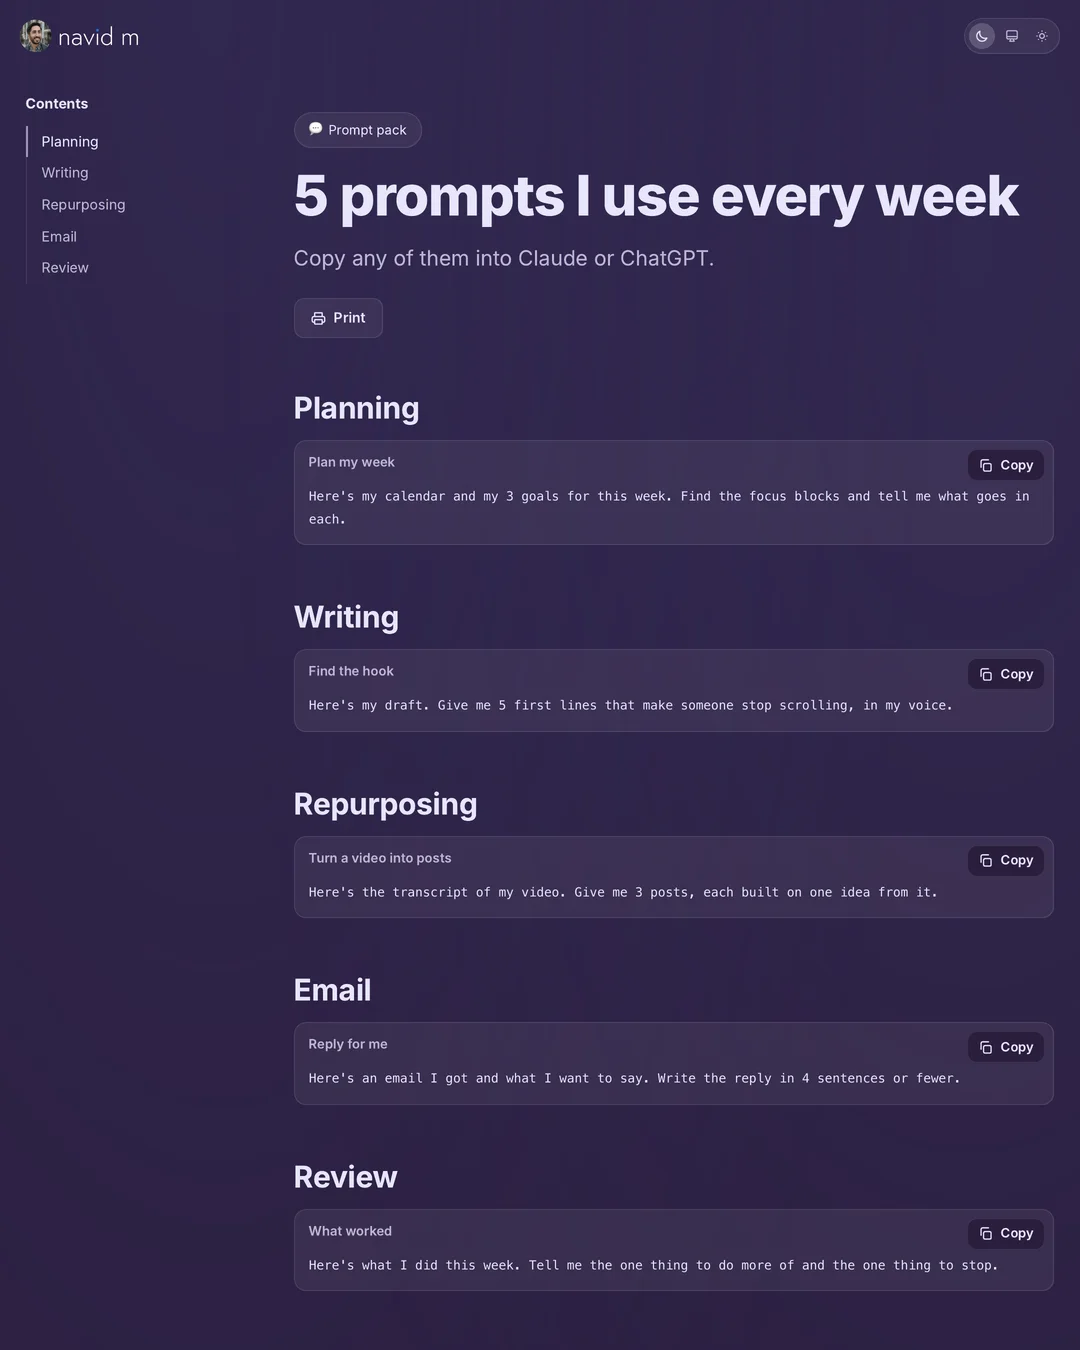
Prompt pack
Prompts in boxes, each with a Copy button. Good for AI prompts for a job.

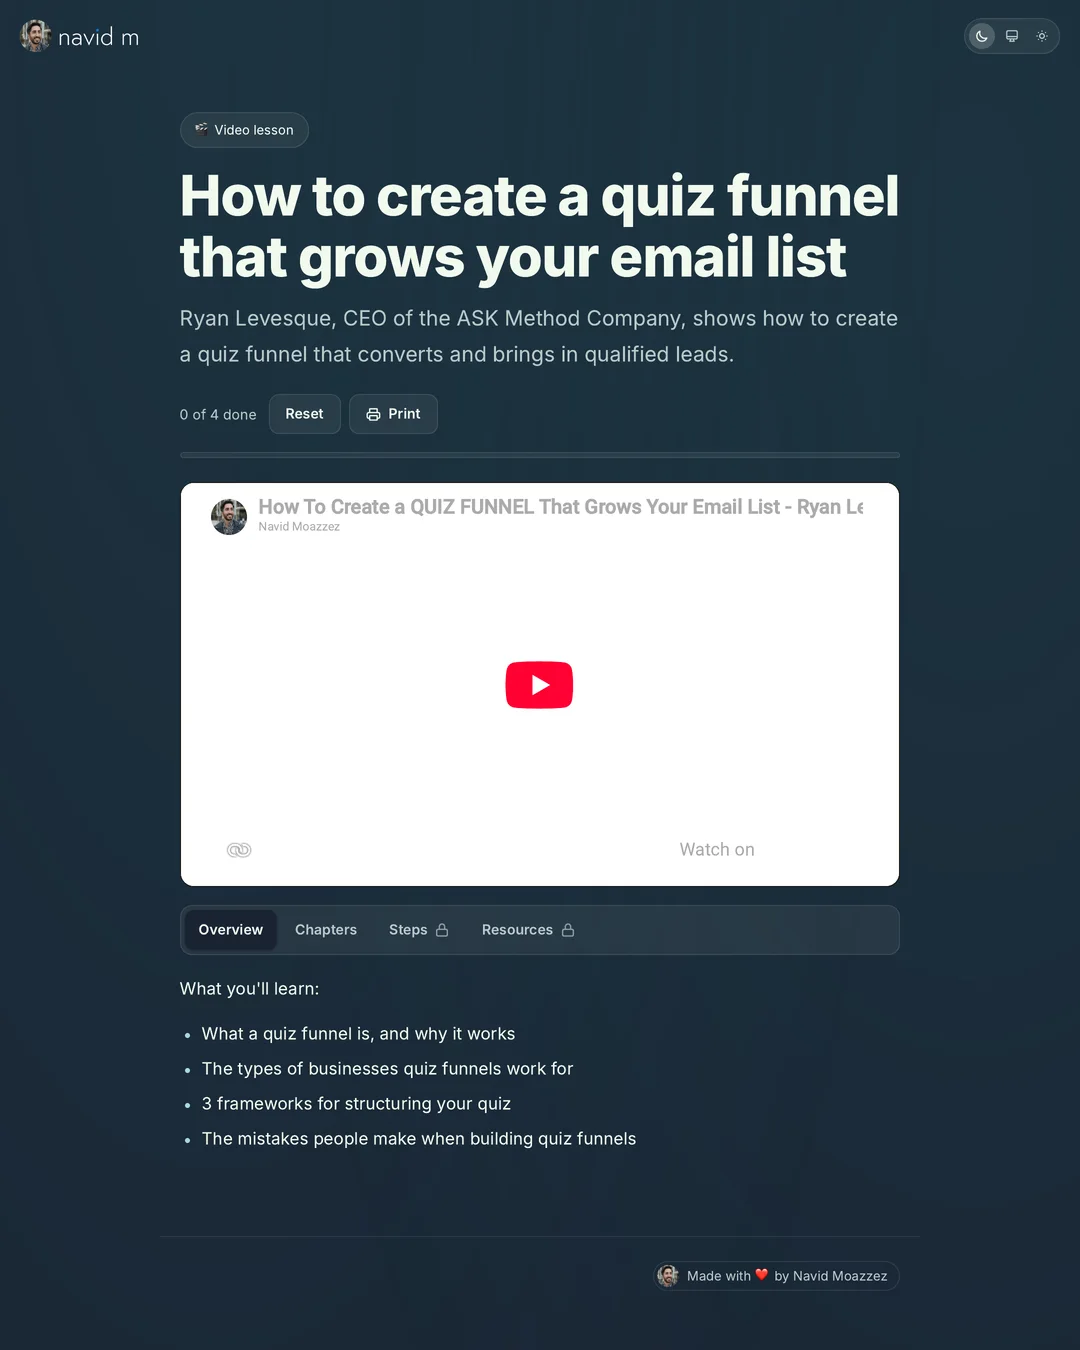
Video lesson
Your video on top, with tabs under it: Overview, Chapters, Steps, Resources, Transcript and Prompts. A chapter's time jumps the video there, for YouTube, Vimeo and your own video files. Name a section like a tab and it becomes that tab.

The lead magnet email gate
Pick one of 3:
- No gate: everything shows, and the subscribe bar can still ask for emails
- After a few sections: readers see the first sections, then the email box, with the rest blurred behind it
- On copy and download: everything shows, and the email box opens when someone copies a prompt or downloads the PDF
Tick "Ask for their first name too", and the email box asks for the first name first, like navid.me's own form, and sends it to your platform's first-name field.
Once someone signs up, the rest opens on the page and stays open in their browser. If your email platform sends them the PDF, a thank-you screen says check your inbox, with Open Gmail and Open Outlook buttons.
What you really need for a lead magnet page
Less than you think. Here's the honest list:
- The page: made here, free, as one HTML file (or the code to paste into a page builder)
- Somewhere to put it: Netlify, Vercel, Cloudflare Pages or GitHub Pages for free, your own hosting (I recommend Hostinger, which runs WordPress too), or the page builder you already pay for
- Your email platform's form, or a connector: with Kit, Mailchimp, MailerLite, Brevo or ActiveCampaign, you paste the form's HTML embed, with no code and no key. With the others, the page needs a small connector that holds your API key
- Claude Code or Codex, only for a connector: it writes the connector, puts it live and tests it for you
No page builder needed, and no monthly fee for the page.
Connect your lead magnet to your email platform
There are 2 ways, and your platform decides the simple one:
| Platform | How it connects | What you need |
|---|---|---|
| Kit | Paste the form's HTML embed | A Kit form |
| beehiiv | A connector, set up by Claude Code or Codex | An API key and your publication ID |
| Mailchimp | Paste the form's HTML embed | An embedded form |
| MailerLite | Paste the form's HTML embed | An embedded form |
| Flodesk | A connector, set up by Claude Code or Codex | An API key and a segment |
| Kajabi | A connector, set up by Claude Code or Codex | The Public API (Pro plan or add-on) |
| HighLevel | A connector, set up by Claude Code or Codex | A Private Integration token |
| ClickFunnels | A connector, set up by Claude Code or Codex | An API access token |
| Brevo | Paste the form's HTML embed | A sign-up form |
| ActiveCampaign | Paste the form's HTML embed | A form's Full Embed |
| SendFox | A connector, set up by Claude Code or Codex | A paid plan, a token and a list |
| Resend | A connector, set up by Claude Code or Codex | An API key and a segment |
| Zapier, Make or n8n | Your webhook | A webhook trigger |
Why 2 ways? Kit, Mailchimp, MailerLite, Brevo and ActiveCampaign give each form a plain HTML version, and the page sends a signup to it exactly the way that form would. The others give a frame or a script, or no form at all. So for those, the page sends signups to a small connector on your own site, which calls the platform with your API key. The key stays on the server, never in the page.
Every platform also has the deeper way: its API, set up by Claude Code or Codex, for tags, custom fields and automations. Each section below has the prompt.
Kit
Kit is email marketing for creators: newsletters, forms and automated emails. Kit gives each form a plain HTML embed. Paste it into the tool: no code, no key.
Here's what you need:
- A Kit account
- A form in Kit for this lead magnet
- Your PDF, if Kit should email it
Then:
- In Kit, open Grow, then Landing Pages & Forms, and create a form or open one.
- Press Embed at the top right, then pick HTML.
- Copy the code, and paste it into the tool, under Where the emails go. The tool shows where it sends emails.
- To email the PDF: open the form's Incentive (confirmation) email, pick Download, and upload your PDF. Then tick "My platform emails them the PDF or a welcome".
- Download your page, and put it live (below).
Want the deeper connection, through the API, for tags, fields and automations later? Paste this into Claude Code or Codex instead:
Connect Kit through the APII made a lead magnet page with a free lead magnet generator: the .html file in this folder. Connect it to my Kit account and put it live. I want the deeper connection, through the API instead of the form, so I can add tags, fields and automations later.
1. Make a folder for the site, and copy the .html file into it as index.html. In it, the opt-in is in the script with the id lm-config: set it to {"kind":"webhook","url":"/api/subscribe"}, so signups go to the function below instead of the platform's form.
2. Add one function at /api/subscribe (on Vercel: api/subscribe.js; on Netlify: netlify/functions/subscribe.mjs with the path /api/subscribe). It reads the email from the form POST (fields: email, first_name, source, page), then calls Kit: create the subscriber with POST https://api.kit.com/v4/subscribers, then add them to my form with POST https://api.kit.com/v4/forms/<form ID>/subscribers, both with the header X-Kit-Api-Key: <API key> and the JSON body {"email_address": email}. If first_name is there, it saves it in the platform's first-name field too. It answers 204 and never shows the key.
3. Keep the API key and the form ID (KIT_API_KEY, KIT_FORM_ID) in environment variables, never in the page. Ask me for them, then set them with the host's command line tool. Find the form ID with the Kit API if I don't know it.
4. Ask me where to run it: Vercel, Netlify, or Hostinger (a Node.js web app, on its Business or Cloud plan). Vercel if I have none. Install what's needed, log me in, and deploy to production. If my page lives on a page builder instead (HighLevel, ClickFunnels, Kajabi, WordPress), deploy only the function, and give me its full address to paste into the lead magnet generator.
5. Test it: sign up with an email I give you, check that Kit has it, and give me the live link. Explain anything that went wrong in plain English.
Kit's own docs: Form embedding basics.
beehiiv
beehiiv is a newsletter platform with its own website, growth tools and ad network. beehiiv's form is a frame, not a plain form. So the page sends signups to a small connector, which calls beehiiv with your API key.
Here's what you need:
- A beehiiv account (the API is on every plan, the free Launch plan too)
- Your identity verified with Stripe: beehiiv asks before it gives API keys
- An API key and your publication ID
- A place for the connector: a free Vercel or Netlify account, or Hostinger on its Business or Cloud plan
- Claude Code or Codex
Then:
- In beehiiv, click Settings, then API under Workspace Settings.
- Click Create New API Key, name it, and copy it. You only see it once.
- On the same page, copy your Publication ID.
- Download your page here, into a new, empty folder.
- Open Claude Code or Codex in that folder, and paste the prompt below.
- Give it what it asks for. It builds the connector, puts it live, and tests one signup.
The prompt to paste into Claude Code or Codex:
Connect beehiivI made a lead magnet page with a free lead magnet generator: the .html file in this folder. When someone signs up, the page sends a form POST to /api/subscribe on its own site, with the fields email, source and page, and first_name when I ask for it. Connect it to my beehiiv account and put it live.
1. Make a folder for the site, and copy the .html file into it as index.html.
2. Add one function at /api/subscribe (on Vercel: api/subscribe.js; on Netlify: netlify/functions/subscribe.mjs with the path /api/subscribe). It reads the email from the form POST (fields: email, first_name, source, page), then calls beehiiv: POST https://api.beehiiv.com/v2/publications/<publication ID>/subscriptions, with the header Authorization: Bearer <API key> and the JSON body {"email": email, "send_welcome_email": true, "utm_source": "lead-magnet", "referring_site": page}. If first_name is there, it saves it in the platform's first-name field too. It answers 204 and never shows the key.
3. Keep the API key and the publication ID (BEEHIIV_API_KEY, BEEHIIV_PUBLICATION_ID) in environment variables, never in the page. Ask me for them, then set them with the host's command line tool.
4. Ask me where to run it: Vercel, Netlify, or Hostinger (a Node.js web app, on its Business or Cloud plan). Vercel if I have none. Install what's needed, log me in, and deploy to production. If my page lives on a page builder instead (HighLevel, ClickFunnels, Kajabi, WordPress), deploy only the function, and give me its full address to paste into the lead magnet generator.
5. Test it: sign up with an email I give you, check that beehiiv has it, and give me the live link. Explain anything that went wrong in plain English.
beehiiv's own docs: How to access your Publication ID or API keys.
Mailchimp
Mailchimp is email marketing and automation for small businesses. Mailchimp gives an embedded form as plain HTML. Paste it into the tool: no code, no key.
Here's what you need:
- A Mailchimp account with an audience
- An embedded form for that audience
Then:
- In Mailchimp, click Forms, then Other forms, then Create new form.
- Pick Create embedded form, name it, and choose your audience.
- Set the fields (the email is the one that matters), then click Continue.
- Click Copy Code, and paste it into the tool, under Where the emails go.
- Download your page, and put it live (below).
Want the deeper connection, through the API, for tags, fields and automations later? Paste this into Claude Code or Codex instead:
Connect Mailchimp through the APII made a lead magnet page with a free lead magnet generator: the .html file in this folder. Connect it to my Mailchimp account and put it live. I want the deeper connection, through the API instead of the form, so I can add tags, fields and automations later.
1. Make a folder for the site, and copy the .html file into it as index.html. In it, the opt-in is in the script with the id lm-config: set it to {"kind":"webhook","url":"/api/subscribe"}, so signups go to the function below instead of the platform's form.
2. Add one function at /api/subscribe (on Vercel: api/subscribe.js; on Netlify: netlify/functions/subscribe.mjs with the path /api/subscribe). It reads the email from the form POST (fields: email, first_name, source, page), then calls Mailchimp: PUT https://<dc>.api.mailchimp.com/3.0/lists/<audience ID>/members/<MD5 of the lowercase email>, with Basic auth (any username, the API key as the password) and the JSON body {"email_address": email, "status_if_new": "subscribed"}. The <dc> is the part of the API key after the dash. If first_name is there, it saves it in the platform's first-name field too. It answers 204 and never shows the key.
3. Keep the API key and the audience ID (MAILCHIMP_API_KEY, MAILCHIMP_AUDIENCE_ID) in environment variables, never in the page. Ask me for them, then set them with the host's command line tool.
4. Ask me where to run it: Vercel, Netlify, or Hostinger (a Node.js web app, on its Business or Cloud plan). Vercel if I have none. Install what's needed, log me in, and deploy to production. If my page lives on a page builder instead (HighLevel, ClickFunnels, Kajabi, WordPress), deploy only the function, and give me its full address to paste into the lead magnet generator.
5. Test it: sign up with an email I give you, check that Mailchimp has it, and give me the live link. Explain anything that went wrong in plain English.
Mailchimp's own docs: Add an Embedded Signup Form to Your Website.
MailerLite
MailerLite is email marketing with forms, landing pages, automations and a free plan. MailerLite gives an embedded form as plain HTML. Paste it into the tool: no code, no key.
Here's what you need:
- A MailerLite account
- An embedded form
Then:
- In MailerLite, open Forms, then Embedded forms, and create a form or open one.
- Click Overview on the form.
- Scroll to Embed form to your website, and click the HTML tab.
- Copy the HTML, and paste it into the tool, under Where the emails go.
- Download your page, and put it live (below).
Want the deeper connection, through the API, for tags, fields and automations later? Paste this into Claude Code or Codex instead:
Connect MailerLite through the APII made a lead magnet page with a free lead magnet generator: the .html file in this folder. Connect it to my MailerLite account and put it live. I want the deeper connection, through the API instead of the form, so I can add tags, fields and automations later.
1. Make a folder for the site, and copy the .html file into it as index.html. In it, the opt-in is in the script with the id lm-config: set it to {"kind":"webhook","url":"/api/subscribe"}, so signups go to the function below instead of the platform's form.
2. Add one function at /api/subscribe (on Vercel: api/subscribe.js; on Netlify: netlify/functions/subscribe.mjs with the path /api/subscribe). It reads the email from the form POST (fields: email, first_name, source, page), then calls MailerLite: POST https://connect.mailerlite.com/api/subscribers, with the header Authorization: Bearer <API token> and the JSON body {"email": email, "groups": [<group ID>]}. If first_name is there, it saves it in the platform's first-name field too. It answers 204 and never shows the key.
3. Keep the API token and the group ID (MAILERLITE_TOKEN, MAILERLITE_GROUP_ID) in environment variables, never in the page. Ask me for them, then set them with the host's command line tool. Find the group ID with the MailerLite API if I don't know it.
4. Ask me where to run it: Vercel, Netlify, or Hostinger (a Node.js web app, on its Business or Cloud plan). Vercel if I have none. Install what's needed, log me in, and deploy to production. If my page lives on a page builder instead (HighLevel, ClickFunnels, Kajabi, WordPress), deploy only the function, and give me its full address to paste into the lead magnet generator.
5. Test it: sign up with an email I give you, check that MailerLite has it, and give me the live link. Explain anything that went wrong in plain English.
MailerLite's own docs: How to add a form to your website.
Flodesk
Flodesk is email marketing known for its designed templates and forms. Flodesk's form is a script, not a plain form. So the page sends signups to a small connector, which adds them to a Flodesk segment.
Here's what you need:
- A Flodesk account and an API key
- A segment for these signups
- A workflow that starts when someone joins the segment, to send the PDF
- A place for the connector: a free Vercel or Netlify account, or Hostinger on its Business or Cloud plan
- Claude Code or Codex
Then:
- In Flodesk, open app.flodesk.com/account/integration/api, create an API key, and copy it.
- Make a segment for this lead magnet, or pick one.
- Download your page here, into a new, empty folder.
- Open Claude Code or Codex in that folder, and paste the prompt below.
- Give it what it asks for. It builds the connector, puts it live, and tests one signup.
The prompt to paste into Claude Code or Codex:
Connect FlodeskI made a lead magnet page with a free lead magnet generator: the .html file in this folder. When someone signs up, the page sends a form POST to /api/subscribe on its own site, with the fields email, source and page, and first_name when I ask for it. Connect it to my Flodesk account and put it live.
1. Make a folder for the site, and copy the .html file into it as index.html.
2. Add one function at /api/subscribe (on Vercel: api/subscribe.js; on Netlify: netlify/functions/subscribe.mjs with the path /api/subscribe). It reads the email from the form POST (fields: email, first_name, source, page), then calls Flodesk: POST https://api.flodesk.com/v1/subscribers, with HTTP Basic auth (the API key as the username, an empty password) and the JSON body {"email": email, "segment_ids": [<segment ID>]}. If first_name is there, it saves it in the platform's first-name field too. It answers 204 and never shows the key.
3. Keep the API key and the segment ID (FLODESK_API_KEY, FLODESK_SEGMENT_ID) in environment variables, never in the page. Ask me for them, then set them with the host's command line tool. Ask me which segment, and find its ID with the Flodesk API (developers.flodesk.com).
4. Ask me where to run it: Vercel, Netlify, or Hostinger (a Node.js web app, on its Business or Cloud plan). Vercel if I have none. Install what's needed, log me in, and deploy to production. If my page lives on a page builder instead (HighLevel, ClickFunnels, Kajabi, WordPress), deploy only the function, and give me its full address to paste into the lead magnet generator.
5. Test it: sign up with an email I give you, check that Flodesk has it, and give me the live link. Explain anything that went wrong in plain English.
Flodesk's own docs: Flodesk API.
Kajabi
Kajabi is an all-in-one platform for courses, coaching, communities and email. Kajabi's form embed is a script, so the page sends signups to a connector that uses Kajabi's Public API. The API comes with Kajabi's Pro plan, or as a $25 a month add-on.
Here's what you need:
- A Kajabi plan with the Public API (Pro, or the $25 a month add-on)
- Your Public API credentials from Kajabi
- A place for the connector: a free Vercel or Netlify account, or Hostinger on its Business or Cloud plan
- Claude Code or Codex
Then:
- Turn on Kajabi's Public API, and get your credentials: Kajabi's guide shows how.
- Pick where these signups should go in Kajabi: a tag, a form or an offer.
- Download your page here, into a new, empty folder.
- Open Claude Code or Codex in that folder, and paste the prompt below.
- Give it what it asks for. It builds the connector, puts it live, and tests one signup.
The prompt to paste into Claude Code or Codex:
Connect KajabiI made a lead magnet page with a free lead magnet generator: the .html file in this folder. When someone signs up, the page sends a form POST to /api/subscribe on its own site, with the fields email, source and page, and first_name when I ask for it. Connect it to my Kajabi account and put it live.
1. Make a folder for the site, and copy the .html file into it as index.html.
2. Add one function at /api/subscribe (on Vercel: api/subscribe.js; on Netlify: netlify/functions/subscribe.mjs with the path /api/subscribe). It reads the email from the form POST (fields: email, first_name, source, page), then adds the email as a contact with Kajabi's Public API. Read its current docs at developers.kajabi.com first, and use only what they show. If first_name is there, it saves it in the platform's first-name field too. It answers 204 and never shows the key.
3. Keep the API credentials (KAJABI_* names of your choice) in environment variables, never in the page. Ask me for them, then set them with the host's command line tool.
4. Ask me where to run it: Vercel, Netlify, or Hostinger (a Node.js web app, on its Business or Cloud plan). Vercel if I have none. Install what's needed, log me in, and deploy to production. If my page lives on a page builder instead (HighLevel, ClickFunnels, Kajabi, WordPress), deploy only the function, and give me its full address to paste into the lead magnet generator.
5. Test it: sign up with an email I give you, check that Kajabi has it, and give me the live link. Explain anything that went wrong in plain English.
Kajabi's own docs: Using Kajabi's Public API.
HighLevel
HighLevel is a CRM and marketing platform with funnels, websites and email. HighLevel's form embed is a frame, so the page sends signups to a connector that adds each one as a contact in your sub-account.
Here's what you need:
- A HighLevel sub-account
- A Private Integration token, with only the contacts permissions
- Your Location ID
- A place for the connector: a free Vercel or Netlify account, or Hostinger on its Business or Cloud plan
- Claude Code or Codex
Then:
- In your sub-account, open Settings, then Other Settings, then Private Integrations.
- Click Create new Integration, name it, and pick only the contacts permissions.
- Copy the token. You can't see it again.
- Copy your Location ID from Settings, then Business Profile.
- Download your page here, into a new, empty folder.
- Open Claude Code or Codex in that folder, and paste the prompt below.
- Give it what it asks for. It builds the connector, puts it live, and tests one signup.
The prompt to paste into Claude Code or Codex:
Connect HighLevelI made a lead magnet page with a free lead magnet generator: the .html file in this folder. When someone signs up, the page sends a form POST to /api/subscribe on its own site, with the fields email, source and page, and first_name when I ask for it. Connect it to my HighLevel account and put it live.
1. Make a folder for the site, and copy the .html file into it as index.html.
2. Add one function at /api/subscribe (on Vercel: api/subscribe.js; on Netlify: netlify/functions/subscribe.mjs with the path /api/subscribe). It reads the email from the form POST (fields: email, first_name, source, page), then calls HighLevel: POST https://services.leadconnectorhq.com/contacts/, with the headers Authorization: Bearer <token> and Version: 2021-07-28, and the JSON body {"locationId": <location ID>, "email": email, "tags": ["lead-magnet"]}. If first_name is there, it saves it in the platform's first-name field too. It answers 204 and never shows the key.
3. Keep the token and the Location ID (HIGHLEVEL_TOKEN, HIGHLEVEL_LOCATION_ID) in environment variables, never in the page. Ask me for them, then set them with the host's command line tool.
4. Ask me where to run it: Vercel, Netlify, or Hostinger (a Node.js web app, on its Business or Cloud plan). Vercel if I have none. Install what's needed, log me in, and deploy to production. If my page lives on a page builder instead (HighLevel, ClickFunnels, Kajabi, WordPress), deploy only the function, and give me its full address to paste into the lead magnet generator.
5. Test it: sign up with an email I give you, check that HighLevel has it, and give me the live link. Explain anything that went wrong in plain English.
HighLevel's own docs: Private Integrations.
ClickFunnels
ClickFunnels is a funnel builder for sales pages, checkouts and email. The page sends signups to a connector that adds each one as a contact in your ClickFunnels workspace.
Here's what you need:
- A ClickFunnels 2.0 account
- An API access token from a platform application
- Your workspace's subdomain
- A place for the connector: a free Vercel or Netlify account, or Hostinger on its Business or Cloud plan
- Claude Code or Codex
Then:
- In ClickFunnels, open Teams List, your team, then Team Settings.
- Open Developer Portal, click Add new platform application, and copy its API access token.
- Note your workspace's subdomain: the part before .myclickfunnels.com.
- Download your page here, into a new, empty folder.
- Open Claude Code or Codex in that folder, and paste the prompt below.
- Give it what it asks for. It builds the connector, puts it live, and tests one signup.
The prompt to paste into Claude Code or Codex:
Connect ClickFunnelsI made a lead magnet page with a free lead magnet generator: the .html file in this folder. When someone signs up, the page sends a form POST to /api/subscribe on its own site, with the fields email, source and page, and first_name when I ask for it. Connect it to my ClickFunnels account and put it live.
1. Make a folder for the site, and copy the .html file into it as index.html.
2. Add one function at /api/subscribe (on Vercel: api/subscribe.js; on Netlify: netlify/functions/subscribe.mjs with the path /api/subscribe). It reads the email from the form POST (fields: email, first_name, source, page), then calls ClickFunnels: POST https://<subdomain>.myclickfunnels.com/api/v2/workspaces/<workspace ID>/contacts, with the header Authorization: Bearer <token> and the contact's email. Read the ClickFunnels API docs (developers.myclickfunnels.com) for the exact body, and find the workspace ID with the API. If first_name is there, it saves it in the platform's first-name field too. It answers 204 and never shows the key.
3. Keep the token, the subdomain and the workspace ID (CF_TOKEN, CF_SUBDOMAIN, CF_WORKSPACE_ID) in environment variables, never in the page. Ask me for them, then set them with the host's command line tool.
4. Ask me where to run it: Vercel, Netlify, or Hostinger (a Node.js web app, on its Business or Cloud plan). Vercel if I have none. Install what's needed, log me in, and deploy to production. If my page lives on a page builder instead (HighLevel, ClickFunnels, Kajabi, WordPress), deploy only the function, and give me its full address to paste into the lead magnet generator.
5. Test it: sign up with an email I give you, check that ClickFunnels has it, and give me the live link. Explain anything that went wrong in plain English.
ClickFunnels's own docs: ClickFunnels API: getting started.
Brevo
Brevo is email, SMS and CRM marketing with a free plan. Brevo gives a sign-up form as simple HTML. Paste it into the tool: no code, no key.
Here's what you need:
- A Brevo account
- A sign-up form without a CAPTCHA: the simple HTML code can't include one
Then:
- In Brevo, create a sign-up form, and save it.
- At the Share step, pick the simple HTML code, and copy it.
- Click Done, so the form is saved.
- Paste the code into the tool, under Where the emails go.
- Download your page, and put it live (below).
Want the deeper connection, through the API, for tags, fields and automations later? Paste this into Claude Code or Codex instead:
Connect Brevo through the APII made a lead magnet page with a free lead magnet generator: the .html file in this folder. Connect it to my Brevo account and put it live. I want the deeper connection, through the API instead of the form, so I can add tags, fields and automations later.
1. Make a folder for the site, and copy the .html file into it as index.html. In it, the opt-in is in the script with the id lm-config: set it to {"kind":"webhook","url":"/api/subscribe"}, so signups go to the function below instead of the platform's form.
2. Add one function at /api/subscribe (on Vercel: api/subscribe.js; on Netlify: netlify/functions/subscribe.mjs with the path /api/subscribe). It reads the email from the form POST (fields: email, first_name, source, page), then calls Brevo: POST https://api.brevo.com/v3/contacts, with the header api-key: <API key> and the JSON body {"email": email, "listIds": [<list ID>], "updateEnabled": true}. If first_name is there, it saves it in the platform's first-name field too. It answers 204 and never shows the key.
3. Keep the API key and the list ID (BREVO_API_KEY, BREVO_LIST_ID) in environment variables, never in the page. Ask me for them, then set them with the host's command line tool.
4. Ask me where to run it: Vercel, Netlify, or Hostinger (a Node.js web app, on its Business or Cloud plan). Vercel if I have none. Install what's needed, log me in, and deploy to production. If my page lives on a page builder instead (HighLevel, ClickFunnels, Kajabi, WordPress), deploy only the function, and give me its full address to paste into the lead magnet generator.
5. Test it: sign up with an email I give you, check that Brevo has it, and give me the live link. Explain anything that went wrong in plain English.
Brevo's own docs: Create a sign-up form in Brevo.
ActiveCampaign
ActiveCampaign is email marketing and automation with a CRM. ActiveCampaign gives each form a full HTML embed. Paste it into the tool: no code, no key.
Here's what you need:
- An ActiveCampaign account
- An inline form
Then:
- In ActiveCampaign, find your form, and click Edit.
- Click Integrate.
- Copy the code in the Full Embed box.
- Paste it into the tool, under Where the emails go.
- Download your page, and put it live (below).
Want the deeper connection, through the API, for tags, fields and automations later? Paste this into Claude Code or Codex instead:
Connect ActiveCampaign through the APII made a lead magnet page with a free lead magnet generator: the .html file in this folder. Connect it to my ActiveCampaign account and put it live. I want the deeper connection, through the API instead of the form, so I can add tags, fields and automations later.
1. Make a folder for the site, and copy the .html file into it as index.html. In it, the opt-in is in the script with the id lm-config: set it to {"kind":"webhook","url":"/api/subscribe"}, so signups go to the function below instead of the platform's form.
2. Add one function at /api/subscribe (on Vercel: api/subscribe.js; on Netlify: netlify/functions/subscribe.mjs with the path /api/subscribe). It reads the email from the form POST (fields: email, first_name, source, page), then calls ActiveCampaign's API v3 at my API URL, with the header Api-Token: <key>: create or update the contact with the email, then add it to my list. Read ActiveCampaign's API docs (developers.activecampaign.com) for the exact bodies. If first_name is there, it saves it in the platform's first-name field too. It answers 204 and never shows the key.
3. Keep the API URL, the key and the list ID (AC_API_URL, AC_API_KEY, AC_LIST_ID) in environment variables, never in the page. Ask me for them, then set them with the host's command line tool.
4. Ask me where to run it: Vercel, Netlify, or Hostinger (a Node.js web app, on its Business or Cloud plan). Vercel if I have none. Install what's needed, log me in, and deploy to production. If my page lives on a page builder instead (HighLevel, ClickFunnels, Kajabi, WordPress), deploy only the function, and give me its full address to paste into the lead magnet generator.
5. Test it: sign up with an email I give you, check that ActiveCampaign has it, and give me the live link. Explain anything that went wrong in plain English.
ActiveCampaign's own docs: Where can I find my form's HTML code?.
SendFox
SendFox is simple, low-cost email marketing for content creators, from AppSumo. SendFox's form is a script, not a plain form. So the page sends signups to a small connector. SendFox's API needs a paid plan: on the Free plan it answers "API access requires a paid plan".
Here's what you need:
- A paid SendFox plan
- A personal access token
- A list for these signups
- A place for the connector: a free Vercel or Netlify account, or Hostinger on its Business or Cloud plan
- Claude Code or Codex
Then:
- In SendFox, open sendfox.com/account/oauth, click Create New Token, name it, and copy it.
- Make a list for this lead magnet, or pick one.
- Download your page here, into a new, empty folder.
- Open Claude Code or Codex in that folder, and paste the prompt below.
- Give it what it asks for. It builds the connector, puts it live, and tests one signup.
The prompt to paste into Claude Code or Codex:
Connect SendFoxI made a lead magnet page with a free lead magnet generator: the .html file in this folder. When someone signs up, the page sends a form POST to /api/subscribe on its own site, with the fields email, source and page, and first_name when I ask for it. Connect it to my SendFox account and put it live.
1. Make a folder for the site, and copy the .html file into it as index.html.
2. Add one function at /api/subscribe (on Vercel: api/subscribe.js; on Netlify: netlify/functions/subscribe.mjs with the path /api/subscribe). It reads the email from the form POST (fields: email, first_name, source, page), then calls SendFox: POST https://api.sendfox.com/contacts, with the header Authorization: Bearer <token> and the fields email and lists (the list's ID). If first_name is there, it saves it in the platform's first-name field too. It answers 204 and never shows the key.
3. Keep the token and the list ID (SENDFOX_TOKEN, SENDFOX_LIST_ID) in environment variables, never in the page. Ask me for them, then set them with the host's command line tool. Ask me which list, and find its ID with the SendFox API. If it answers 402, tell me: the API needs a paid SendFox plan.
4. Ask me where to run it: Vercel, Netlify, or Hostinger (a Node.js web app, on its Business or Cloud plan). Vercel if I have none. Install what's needed, log me in, and deploy to production. If my page lives on a page builder instead (HighLevel, ClickFunnels, Kajabi, WordPress), deploy only the function, and give me its full address to paste into the lead magnet generator.
5. Test it: sign up with an email I give you, check that SendFox has it, and give me the live link. Explain anything that went wrong in plain English.
SendFox's own docs: What are SendFox's API endpoints?.
Resend
Resend is an email API for developers, with contacts and broadcasts. Resend has no signup form, so the page sends signups to a connector that adds each one as a contact, in a segment.
Here's what you need:
- A Resend account and an API key
- A segment for these signups
- A verified domain, if Resend should email the PDF
- A place for the connector: a free Vercel or Netlify account, or Hostinger on its Business or Cloud plan
- Claude Code or Codex
Then:
- In Resend, create an API key, and copy it.
- Make a segment for this lead magnet.
- Download your page here, into a new, empty folder.
- Open Claude Code or Codex in that folder, and paste the prompt below.
- Give it what it asks for. It builds the connector, puts it live, and tests one signup.
The prompt to paste into Claude Code or Codex:
Connect ResendI made a lead magnet page with a free lead magnet generator: the .html file in this folder. When someone signs up, the page sends a form POST to /api/subscribe on its own site, with the fields email, source and page, and first_name when I ask for it. Connect it to my Resend account and put it live.
1. Make a folder for the site, and copy the .html file into it as index.html.
2. Add one function at /api/subscribe (on Vercel: api/subscribe.js; on Netlify: netlify/functions/subscribe.mjs with the path /api/subscribe). It reads the email from the form POST (fields: email, first_name, source, page), then calls Resend: POST https://api.resend.com/contacts, with the header Authorization: Bearer <API key> and the JSON body {"email": email, "segments": [{"id": <segment ID>}]}. If first_name is there, it saves it in the platform's first-name field too. It answers 204 and never shows the key.
3. Keep the API key and the segment ID (RESEND_API_KEY, RESEND_SEGMENT_ID) in environment variables, never in the page. Ask me for them, then set them with the host's command line tool. If I want Resend to email the PDF too, send it with Resend's emails endpoint, from my verified domain.
4. Ask me where to run it: Vercel, Netlify, or Hostinger (a Node.js web app, on its Business or Cloud plan). Vercel if I have none. Install what's needed, log me in, and deploy to production. If my page lives on a page builder instead (HighLevel, ClickFunnels, Kajabi, WordPress), deploy only the function, and give me its full address to paste into the lead magnet generator.
5. Test it: sign up with an email I give you, check that Resend has it, and give me the live link. Explain anything that went wrong in plain English.
Resend's own docs: Create contact.
Zapier, Make or n8n
Zapier, Make or n8n are automation tools that connect your apps without code: Zapier, Make and n8n. Each signup goes to your webhook as a form with the fields email, source (the page's title) and page (its address), plus first_name when you ask for it. Your automation takes it from there.
Here's what you need:
- Zapier, Make or n8n
- A webhook trigger's address, starting with https://
Then:
Put your lead magnet live
Pick where it goes, and the tool gives you the right thing: the page file for a host, or the embed code for a page builder.
| Where | How | What you use |
|---|---|---|
| Netlify | Drag and drop a folder | The page file |
| Vercel | Drag and drop a file or folder | The page file |
| Cloudflare Pages | Drag and drop a folder | The page file |
| GitHub Pages | Upload to a repository | The page file |
| Hostinger | Upload with the File Manager | The page file |
| DigitalOcean | Deploy from a GitHub repository | The page file |
| Railway | railway up, or the prompt | The page file |
| HighLevel | Paste the embed code | The embed code |
| ClickFunnels | Paste the embed code | The embed code |
| Kajabi | Paste the embed code | The embed code |
| WordPress (self-hosted) | Paste the embed code | The embed code |
| Your own site | Upload the file, or paste the embed code | Either |
The embed code is your page in a frame that grows to its full height, with a small script after it. Page builders paste it into their HTML block, and the page's styles and theirs can't clash.
Using a connector? GitHub Pages, Cloudflare drag and drop and page builders don't run the connector. Put it on Vercel, Netlify, or Hostinger's Business or Cloud plan (the prompt for your platform does it), then paste its full address into the tool, under Where the emails go.
Netlify
Netlify hosts websites, with drag and drop publishing. Log in first: a drop without an account is locked with a password, and deleted within an hour unless you claim it.
Here's what you need:
- A free Netlify account
- A folder with your page in it, named index.html
Then:
- Make a new folder, put your page in it, and rename the page index.html.
- Log in to Netlify.
- Open app.netlify.com/drop.
- Drag the folder onto the page.
- Your page is live at an address ending in netlify.app.
- To update it, drag the new folder onto the drop zone on the site's Deploys page.
Netlify's own docs: Netlify Drop quickstart.
Vercel
Vercel hosts websites and apps, from the team behind Next.js. Each drop makes a new project. To update the same address later, use the prompt below.
Here's what you need:
- A free Vercel account
Then:
- Open vercel.com/drop, and log in.
- Drag your page onto it: a file, a folder or a .zip.
- Choose your team, and give the project a name.
- Click Deploy. You get the live link when it finishes.
- If your page isn't named index.html, Vercel asks which page opens first: pick it.
Vercel's own docs: Deploying with Vercel Drop.
Cloudflare Pages
Cloudflare Pages hosts sites on Cloudflare's network, with drag and drop uploads. A drag and drop upload can't run a connector's functions. With a connector, put the connector on Vercel or Netlify.
Here's what you need:
- A free Cloudflare account
- A folder with your page in it, named index.html
Then:
- Make a new folder, put your page in it, and rename the page index.html.
- In Cloudflare, open Workers & Pages.
- Click Create application, then Get started, and pick Drag and drop your files.
- Name the project, and drag the folder in.
- Click Deploy site. Your page is live at your-project.pages.dev.
Cloudflare Pages's own docs: Direct Upload.
GitHub Pages
GitHub Pages hosts a page or a site for free, straight from a GitHub repository. GitHub Pages serves files only. With a connector (beehiiv, Flodesk, Kajabi, HighLevel, ClickFunnels, SendFox or Resend), put the connector on Vercel or Netlify.
Here's what you need:
- A free GitHub account (on the free plan, the repository must be public)
Then:
- Rename your page to index.html.
- On GitHub, click the + at the top right, then New repository (or open github.com/new).
- Name it, set it to Public, turn on Add README, and click Create repository.
- Click Add file, then Upload files, drop in index.html, and click Commit changes.
- Open Settings, then Pages. Set the source to deploy from a branch: main, and / (root). Save.
- Wait up to 10 minutes. Your page is at https://your-username.github.io/your-repository/.
GitHub Pages's own docs: Creating a GitHub Pages site.
Hostinger
Hostinger is the host I recommend: it runs WordPress, plain pages like this one, and Node.js apps. Hostinger hosts all 3: WordPress sites, plain pages like this one, and Node.js apps on its Business and Cloud plans, so a connector can live there too. An index.html straight in public_html replaces the homepage that's there, so use a folder.
Here's what you need:
- A Hostinger hosting plan with your domain
Then:
- Rename your page to index.html.
- In hPanel, click Dashboard next to your domain, then File Manager.
- Open public_html, make a new folder in it (like freebie), and open that folder.
- Click Upload at the top right, and drop in index.html.
- Your page is live at yourdomain.com/freebie/.
Hostinger's own docs: How to use the Hostinger File Manager.
DigitalOcean
DigitalOcean hosts static sites on App Platform, free for up to 3 of them. App Platform deploys from a GitHub repository, and redeploys each time you change it.
Here's what you need:
- A DigitalOcean account
- A GitHub repository with your page as index.html at its top
Then:
- Put your page in a GitHub repository, as index.html at the top (the GitHub Pages steps show how).
- In DigitalOcean, click Create App.
- Pick GitHub, choose the repository and its branch, and keep Autodeploy on.
- App Platform finds index.html and sets it up as a static site. Review, then click Create Resources.
- Your page's address is at the top of the app's Overview page.
DigitalOcean's own docs: How to manage static sites in App Platform.
Railway
Railway deploys apps and sites from GitHub or its command line tool. Railway sees a folder with only index.html as a static site, and serves it with Caddy. The prompt below does it for you.
Here's what you need:
- A Railway account
- Claude Code or Codex, or the Railway command line tool
Then:
- Put your page in a new folder, as index.html.
- Install the Railway command line tool, and log in.
- In the folder, run railway up. It uploads the folder, and Railway builds and serves it.
- In Railway, open the service's settings, and generate a domain for its address.
Railway's own docs: Deploy static sites.
HighLevel
HighLevel builds funnels and websites, with a custom code element for your own HTML. Page builders strip or change code sometimes. If something looks off, give the embed code and what you see to Claude Code or Codex with the prompt below, and it adjusts it.
Here's what you need:
- A HighLevel funnel or website page
Then:
- Copy the embed code (the button in the tool, under Put it live).
- In HighLevel, open Sites, then your funnel or website, and edit the page.
- Add a custom code element (Custom JS/HTML) where the page should go, and paste the code. Keep the script on its own, not inside a <div>.
- Save, and preview the page. Then publish.
The prompt for Claude Code or Codex, if anything needs a tweak:
Put it on HighLevelI'm adding a lead magnet page to my HighLevel page. The page's embed code is in embed.html in this folder (I'll paste it there first): a frame with the page inside, and a small script after it that sets the frame's height.
1. Check it works in HighLevel's custom code element: nothing the builder strips, the script outside any <div>, and no clash with the page around it.
2. If the email form uses a connector at /api/subscribe, change it to the connector's full address.
3. Give me the exact code to paste, and the steps in HighLevel, click by click.
4. After I publish, I'll give you the link: open it, and check that the page loads, the email form works, and the video plays.
HighLevel's own docs: Custom code in funnels.
ClickFunnels
ClickFunnels builds funnels, with an HTML/JS element for your own code. Page builders strip or change code sometimes. If something looks off, give the embed code and what you see to Claude Code or Codex with the prompt below, and it adjusts it.
Here's what you need:
- A ClickFunnels page
Then:
- Copy the embed code (the button in the tool, under Put it live).
- In ClickFunnels, open the page in the editor, and add a Section, then a Row.
- Click Add New Element, and pick HTML/JS from MISC.
- In its settings, click Open Code Editor, paste the code, and save.
- Preview the page, then publish.
The prompt for Claude Code or Codex, if anything needs a tweak:
Put it on ClickFunnelsI'm adding a lead magnet page to my ClickFunnels page. The page's embed code is in embed.html in this folder (I'll paste it there first): a frame with the page inside, and a small script after it that sets the frame's height.
1. Check it works in ClickFunnels's custom code element: nothing the builder strips, the script outside any <div>, and no clash with the page around it.
2. If the email form uses a connector at /api/subscribe, change it to the connector's full address.
3. Give me the exact code to paste, and the steps in ClickFunnels, click by click.
4. After I publish, I'll give you the link: open it, and check that the page loads, the email form works, and the video plays.
ClickFunnels's own docs: HTML/JS: insert custom HTML and JavaScript code.
Kajabi
Kajabi builds your website and landing pages, with a Custom Code block. Page builders strip or change code sometimes. If something looks off, give the embed code and what you see to Claude Code or Codex with the prompt below, and it adjusts it.
Here's what you need:
- A Kajabi website page or landing page
Then:
- Copy the embed code (the button in the tool, under Put it live).
- In Kajabi, open Website, find the page, and click its title to edit it.
- Open a section, click Add block, then Custom Code.
- Paste the code in the Code field, and click Save.
- Preview the page, then publish.
The prompt for Claude Code or Codex, if anything needs a tweak:
Put it on KajabiI'm adding a lead magnet page to my Kajabi page. The page's embed code is in embed.html in this folder (I'll paste it there first): a frame with the page inside, and a small script after it that sets the frame's height.
1. Check it works in Kajabi's custom code element: nothing the builder strips, the script outside any <div>, and no clash with the page around it.
2. If the email form uses a connector at /api/subscribe, change it to the connector's full address.
3. Give me the exact code to paste, and the steps in Kajabi, click by click.
4. After I publish, I'll give you the link: open it, and check that the page loads, the email form works, and the video plays.
Kajabi's own docs: Add custom code to pages.
WordPress (self-hosted)
WordPress (self-hosted) (WordPress.org) runs millions of websites, with a Custom HTML block in its editor. It works on self-hosted WordPress when you're an Administrator or an Editor: both can add code on a normal site (on Multisite, only a Super Admin can). On WordPress.com, code like this needs the Creator plan or higher, with hosting features turned on.
Here's what you need:
- A self-hosted WordPress site (WordPress.org). WordPress needs a host: I recommend Hostinger, which sets WordPress up for you
- An Administrator or Editor account
Then:
- Copy the embed code (the button in the tool, under Put it live).
- In WordPress, edit the page, and add a Custom HTML block.
- Paste the code, and click Preview.
- Publish.
- If a security plugin strips the script, the page still shows, one screen tall, with its own scroll.
The prompt for Claude Code or Codex, if anything needs a tweak:
Put it on WordPress (self-hosted)I'm adding a lead magnet page to my WordPress (self-hosted) page. The page's embed code is in embed.html in this folder (I'll paste it there first): a frame with the page inside, and a small script after it that sets the frame's height.
1. Check it works in WordPress (self-hosted)'s custom code element: nothing the builder strips, the script outside any <div>, and no clash with the page around it.
2. If the email form uses a connector at /api/subscribe, change it to the connector's full address.
3. Give me the exact code to paste, and the steps in WordPress (self-hosted), click by click.
4. After I publish, I'll give you the link: open it, and check that the page loads, the email form works, and the video plays.
WordPress (self-hosted)'s own docs: Roles and capabilities (unfiltered_html).
Your own site
Your own site works too: the page is one HTML file.
Here's what you need:
- Access to your site's files, or to a page's HTML
Then:
- For a page of its own: rename your page to index.html, and upload it to a new folder on your site with your host's file manager, like /freebie/. It opens at yoursite.com/freebie/.
- Or inside a page you already have: copy the embed code, and paste it into that page's HTML.
Or let Claude Code or Codex put it live
Open Claude Code or Codex in the folder with your page, and paste this:
Put it livePut my lead magnet page live on Netlify, Vercel or GitHub Pages (ask me which, and suggest one if I don't know). The page is the .html file in this folder.
1. Make a folder for the site, and copy the .html file into it as index.html.
2. Install that host's command line tool if I don't have it, log me in, and deploy the folder to production.
3. Give me the live link. Open it, and check that the page loads, the light and dark switch works, and the email form shows.
4. Tell me in plain English how to add my own domain, and how to update the page later.
Every host lets you add your own domain, like freebies.yoursite.com, in the site's domain settings. The prompt above asks for the steps for yours.
New to Claude Code or Codex?
Both are AI assistants that work on the files on your computer: they write the code, run the commands and deploy for you. You only need one.
Claude Code
- You need a Claude plan (Pro, Max, Team or Enterprise) or a Claude Console account.
- Open the Terminal on a Mac, or PowerShell on Windows.
- Install it. On a Mac or Linux, paste this and press Enter:
Install Claude Code on a Mac or Linuxcurl -fsSL https://claude.ai/install.sh | bash
On Windows, in PowerShell:
Install Claude Code on Windowsirm https://claude.ai/install.ps1 | iex
- Go into your page's folder: type cd and a space, drag the folder into the window, and press Enter.
- Type claude and press Enter. The first time, it opens your browser to log in.
- Paste the prompt for your platform or your host.
Rather not use a terminal? Claude Code also comes as a desktop app and in VS Code. Anthropic's guide: Claude Code quickstart.
Codex
- You sign in with your ChatGPT account.
- Install it. In the Terminal on a Mac or Linux:
Install Codexcurl -fsSL https://chatgpt.com/codex/install.sh | sh
- Go into your page's folder (cd, a space, then drag the folder in), type codex, and press Enter.
- Choose Sign in with ChatGPT.
- Paste the prompt for your platform or your host.
Codex also comes as a desktop app and an editor extension. OpenAI's guide: Codex CLI.
Lead magnet styles, light and dark
8 styles, each with a light and a dark version: navid.me's own, Golden hour, Boulevard, Desert rose, Forest, Ocean, Midnight and Minimal. Each one is tuned so the words, links and buttons read clearly in both.
Choose how the page opens (light, dark, or the reader's system), and show the switch so readers can change it. Fonts come from Google Fonts: pick one from the list, or type any Google font's name.
Your logo and the footer
Your logo sits top left, like a site's menu, with your name and photo under the title.
The footer works like navid.me's: your notice on the left, the credit on the right, your privacy and terms links under them, then your disclosure. Line it up on the left or in the center. Keep the small "Made with ❤️ by Navid Moazzez" credit, or switch it off.
What makes a lead magnet work
The best lead magnets have 4 things in common:
- One problem, solved fast. A checklist people finish beats a guide they save for later
- A clear next step at the end: your newsletter, your course, a call
- Give most of it away. Gate after the first sections, so people see it's worth their email
- Match what you sell. The lead magnet should lead naturally to your product
Need promo images for it? Use my post image generator, a carousel, or turn it into slides with my presentation generator. Share the page with a QR code and a tracked link from my UTM builder.
Lead Magnet Generator FAQs
Questions about making a lead magnet? Here's what to know.
A lead magnet generator is a tool that turns your content into something people give their email for. This one makes an interactive page: a checklist, guide, step by step, prompt pack or video lesson, with an email gate and your own email platform's form.
A lead magnet is something useful you give away in exchange for an email address, like a checklist, a short guide or a set of prompts. It solves one small problem quickly.
Yes, it's free: no signup and nothing to install, and the credit can be switched off. The page is made in your browser.
12, step by step: Kit, beehiiv, Mailchimp, MailerLite, Flodesk, Kajabi, HighLevel, ClickFunnels, Brevo, ActiveCampaign, SendFox and Resend. With Kit, Mailchimp, MailerLite, Brevo and ActiveCampaign, you paste the form's HTML embed. With the others, Claude Code or Codex sets up a small connector with your API key. Anything else connects through Zapier, Make or n8n.
Yes. Copy the embed code and paste it into the page builder's HTML block: HighLevel's custom code element, ClickFunnels' HTML/JS element, Kajabi's Custom Code block or WordPress's Custom HTML block. The page sits in a frame that grows to its full height. On WordPress, it works on self-hosted sites for Administrators and Editors; WordPress.com needs the Creator plan or higher.
No. With a form platform you paste a form and download the page. With a connector, you paste a prompt into Claude Code or Codex, and it writes the connector, puts it live and tests it.
Netlify, Vercel and Cloudflare Pages let you drag and drop it for free, GitHub Pages and DigitalOcean host it from a repository, and Hostinger takes it through its File Manager. Or paste the embed code into HighLevel, ClickFunnels, Kajabi or self-hosted WordPress. The post has the steps for each.
Yes, through your email platform: Kit's incentive email can attach the PDF, beehiiv's welcome email can link it, and Flodesk can send it from a workflow. Tick the box in the tool, and the thank-you screen tells readers to check their inbox.
Yes. Your logo sits top left on the page, like a site's menu, and your name and photo move under the title.
Yes. Choose how the page opens, light, dark or the reader's system, and show the switch so they can change it. Their choice is remembered.
It's blurred and can't be clicked or copied until someone signs up. It's still inside the page, so treat the gate as a nudge, and send the full version, like the PDF, by email.
No. Everything is made in your browser, and your work is kept in this browser only. The preview never sends an email anywhere.
Navid.me is reader-supported. When you buy through links on this site, I may earn an affiliate commission. Learn more.
More free tools
The most actionable AI newsletter for founders
Every week, get proven AI strategies, curated tools, and step-by-step systems to grow your audience, create better content, and build a profitable creator business.
No fluff, no filler, no BS. Just five minutes each week that might level up your online business and life.
P.S. Sign up now to get free access to my ultimate AI tools guide for creators.